I guess there will just be more music discussion done here.
Saturday, August 10, 2013
Wednesday, June 20, 2012
Renoise Tutorial: BREAKS
I'm going to start this tutorial off with saying: I'm not all that great with breaks or breakbeats. I spent a good chunk of time only really using the Amen break, which is what this tutorial will focus on. I'm going to use a tempo of 170 and really turn the amen into a beast of a loop. With that I will explore the different ways to use the Renoise instrument setting and sample editor.
First thing's first: let's get the default template I'm working with. I will have 170 BPM, 8 lines a beat,256 64 lines, 16 lines per tick and -3dB headroom. This is my favourite resolution to work with Renoise on. It's not entirely important that you have the same layout, but it may help in case it gets confusing.

Alright, so now that we have that done, we will take a full Amen break and do some minor adjustments. Here's the sample I used.
So once you have the sample, drag and drop it into your instrument window like this.

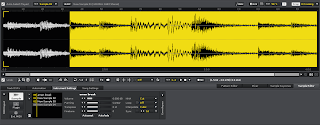
Go to your sample editor and now you can see the Amen for all it's glory.

So you'll notice the first thing is that the intro of the loop has a nice instrumental hit at the beginning of the loop. We don't want that because we want a solid drum break with just the drum hits. So we're going to turn our sample cursor resolution to 0 Crossing, meaning the cursor will only drop where the sample crosses the 0 degrees phase. This is important so that we get a nice clean start and not odd snapping at the beginning of the sample. Note where in the sample I am starting the cut.


I am going to cut our now 3 bar sample into two seperate instruments. One will be just the first bar, which I will sequence and loop twice, and the second instrument will be the third and fourth bars. I will focus primarily on the first break now because all the technique can be applied to the second.

Cut this, and paste it into a new instrument.

Now disregard that and follow me into the wonderful world of slicing and instrument editing. Unknown to most people, Renoise has a very powerful sampling engine and a rather unique (unless trackers are old news to you, then you should recognize almost everything) way of creating instruments. They have implemented a really nice Slice feature that is perfect for exactly what I'm talking about, but we're not going to focus on that. I'm going to show you a way I cut and manipulate the actual hits from the break to create a more authentic feeling to the transposed time signature.
If you hadn't noticed, the Amen isn't exactly at 170 BPM. It's more around 134 or so. So what we're going to do is cut the sample up, and place it on different parts of our keyboard.

So we're going to cut out everything but the first hit. Remember to hit cut, and not copy as you want to remove everything but the first kick drum. Once you've cut the sample, click on the new sample button and hit ctrl+v and you will see the rest of your beat fill out. Remember this process, we're going to do it for (almost) all the hits in the loop.

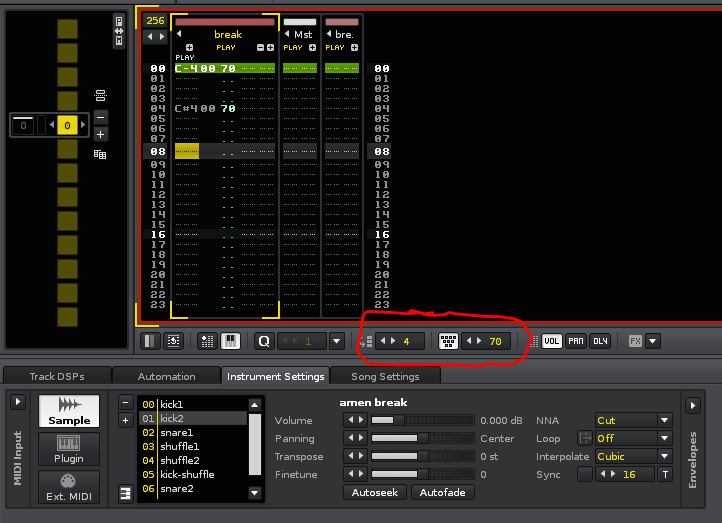
Go to your Sample Keyzones and hit the button that says Drum Kit. This will split all your samples up to each key. As you add new samples, they are added down the keyboard. Now we're going to leave behind one hit, cut the rest, create a new sample, and paste it and repeat.
Hit each key on your keyboard to see how the different hits are starting to sound.
So you're going to get to this part here, which I like to call the shuffle. It's when there's a hihat and a snare shuffling back and forth. I count the shuffle as one hit because it has enormous groove that I don't want to get rid of and because it fits well onto the sequencer when we map this break out.
It's also common practice to name and rename your samples so that you are not confused as to which part of the break is where.

So here I've mapped out and cut all my samples out and they are in their respective key slots.

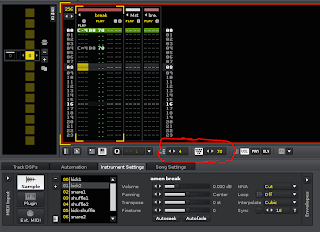
Now we are going to sequence our first break and it's going to be simple. Look at the screen shot below, see the '4' that's circled? That moved 4 lines down after every note placement. When it's at 4, start at line 00 and just move down the keyboard over and over again. If you don't want to deal with such a long pattern, do what I am doing and make the pattern length 64.

Now listen, you've created a pretty sloppy chopped up Amen break at 170 BPM. Now we're going to take this time to play with the sample editor and really make the break feel 170.
Open up your first kick sample, change the snap to 16 beats. Select the 1.4 marker and delete everything to the right of it.

And then once that is done, hit the fade-out button (or hit ctrl+o) and watch the sample's volume fade to nothing. This is how we're going to make the beat feel 170. Now go ahead and do that to all the samples except the shuffles. They are in for some more manipulation.

If you listen to your pattern now you will notice all the kicks and snares sound clean where as the shuffles are noisy and kind of awkward. What happens is that we have a tempo mismatch and we're going to use our keen slicing and dicing and understanding of music creation to fix that. Open up the first shuffle, turn your snap to 0 Crossing.

So you may notice that the hit of the shuffle is a few milliseconds before the actual start of the sample. We want to change that. We're going to delete anything extra that is in front of the first hit. Once that's deleted we will want to move the snare hit to a tempo appropriate location. Delete the tail of the hihats to achieve this.

So you can see where the start of the snare hit is and the next appropriate beat (the buttom numbers of the sample editor) it 1.2. Now there will be a tail from the snare that exceeds the 1.4 mark, making the sample just a bit longer than we need it to be.

Once that is deleted you will now have a shuffle that is perfectly in time with the tempo and sounds much better. What I'm going to do, just to create a more dramatic shuffling effect is select just the hihat hit and hit the fade out button (again, ctrl+o if you prefer key commands). This will cause the tail of the hihat to end before the snare hit. I will apply the same technique to the snare hit.


Another tip to look for to make sure that you are close to the right tempo with sample is that the HEX at the top of the Sample Editor is for the Sample Offset command (Sxx) you will see that the snare hit sits right at 80, which is exact middle of the sample. Keep that in note as I am going to use the Sxx command to add some flare and uniqueness to the break.
So once you have done the pain staking task of turning all your samples into the tempo-accurate hybrids, listen to your break. It sounds clean! It sounds good! The one issue I have always had with the amen break though, is that double-kick shuffle just before the second snare. It's muddy, it's harsh, and it just sounds like garbage. It should be the shuffle mapped to F. I'm actually going to go through my pattern and remove all the Fs and leave them with a single kick at 58 volume.

Keep this pattern, this will be your go-to pattern for the standard break. Now I want you to clone this pattern and work on some variation. Here's the XML data from my second sequence. Copy all that XML and paste it into Renoise. As you can see it's a small but subtle change.
NOTE: The XML is assuming that your break is instrument 00, as mine is. If you have been following the tutorial, it should be fine. Don't worry, I'll upload the finished file for all to see and understand.
Alright, and here's some more variations for you, just to try out and have fun with.
Now that you have the basics of the break down and you are working on variations, we're going to dig a bit deeper into the instrument settings.

So open up the envelopes tab on your instrument editor. The default one will be volume, and that'll be the only one we play with. So which ever envelopes you add to an instrument, it is applied to all the samples of that instrument. What I want to be able to do is use just the snare or just the hihats from the shuffle. The issue when I trigger the shuffle is that it plays both hats and snare. I want to be able to do an OFF note right after the hihat hit, giving me a nice hat sound to construct beats with. So go ahead, turn the Volume envelope on and make it 7 lines large.


(Some culture for you fools.)
First thing's first: let's get the default template I'm working with. I will have 170 BPM, 8 lines a beat,

Alright, so now that we have that done, we will take a full Amen break and do some minor adjustments. Here's the sample I used.
So once you have the sample, drag and drop it into your instrument window like this.

So you'll notice the first thing is that the intro of the loop has a nice instrumental hit at the beginning of the loop. We don't want that because we want a solid drum break with just the drum hits. So we're going to turn our sample cursor resolution to 0 Crossing, meaning the cursor will only drop where the sample crosses the 0 degrees phase. This is important so that we get a nice clean start and not odd snapping at the beginning of the sample. Note where in the sample I am starting the cut.

So select everything to the left, and hit delete.


Cut this, and paste it into a new instrument.

Now disregard that and follow me into the wonderful world of slicing and instrument editing. Unknown to most people, Renoise has a very powerful sampling engine and a rather unique (unless trackers are old news to you, then you should recognize almost everything) way of creating instruments. They have implemented a really nice Slice feature that is perfect for exactly what I'm talking about, but we're not going to focus on that. I'm going to show you a way I cut and manipulate the actual hits from the break to create a more authentic feeling to the transposed time signature.
If you hadn't noticed, the Amen isn't exactly at 170 BPM. It's more around 134 or so. So what we're going to do is cut the sample up, and place it on different parts of our keyboard.

So we're going to cut out everything but the first hit. Remember to hit cut, and not copy as you want to remove everything but the first kick drum. Once you've cut the sample, click on the new sample button and hit ctrl+v and you will see the rest of your beat fill out. Remember this process, we're going to do it for (almost) all the hits in the loop.

Go to your Sample Keyzones and hit the button that says Drum Kit. This will split all your samples up to each key. As you add new samples, they are added down the keyboard. Now we're going to leave behind one hit, cut the rest, create a new sample, and paste it and repeat.
Hit each key on your keyboard to see how the different hits are starting to sound.

So you're going to get to this part here, which I like to call the shuffle. It's when there's a hihat and a snare shuffling back and forth. I count the shuffle as one hit because it has enormous groove that I don't want to get rid of and because it fits well onto the sequencer when we map this break out.
It's also common practice to name and rename your samples so that you are not confused as to which part of the break is where.

So here I've mapped out and cut all my samples out and they are in their respective key slots.

Now we are going to sequence our first break and it's going to be simple. Look at the screen shot below, see the '4' that's circled? That moved 4 lines down after every note placement. When it's at 4, start at line 00 and just move down the keyboard over and over again. If you don't want to deal with such a long pattern, do what I am doing and make the pattern length 64.

Now listen, you've created a pretty sloppy chopped up Amen break at 170 BPM. Now we're going to take this time to play with the sample editor and really make the break feel 170.
Open up your first kick sample, change the snap to 16 beats. Select the 1.4 marker and delete everything to the right of it.

And then once that is done, hit the fade-out button (or hit ctrl+o) and watch the sample's volume fade to nothing. This is how we're going to make the beat feel 170. Now go ahead and do that to all the samples except the shuffles. They are in for some more manipulation.

If you listen to your pattern now you will notice all the kicks and snares sound clean where as the shuffles are noisy and kind of awkward. What happens is that we have a tempo mismatch and we're going to use our keen slicing and dicing and understanding of music creation to fix that. Open up the first shuffle, turn your snap to 0 Crossing.

So you may notice that the hit of the shuffle is a few milliseconds before the actual start of the sample. We want to change that. We're going to delete anything extra that is in front of the first hit. Once that's deleted we will want to move the snare hit to a tempo appropriate location. Delete the tail of the hihats to achieve this.

So you can see where the start of the snare hit is and the next appropriate beat (the buttom numbers of the sample editor) it 1.2. Now there will be a tail from the snare that exceeds the 1.4 mark, making the sample just a bit longer than we need it to be.

Once that is deleted you will now have a shuffle that is perfectly in time with the tempo and sounds much better. What I'm going to do, just to create a more dramatic shuffling effect is select just the hihat hit and hit the fade out button (again, ctrl+o if you prefer key commands). This will cause the tail of the hihat to end before the snare hit. I will apply the same technique to the snare hit.


Another tip to look for to make sure that you are close to the right tempo with sample is that the HEX at the top of the Sample Editor is for the Sample Offset command (Sxx) you will see that the snare hit sits right at 80, which is exact middle of the sample. Keep that in note as I am going to use the Sxx command to add some flare and uniqueness to the break.
So once you have done the pain staking task of turning all your samples into the tempo-accurate hybrids, listen to your break. It sounds clean! It sounds good! The one issue I have always had with the amen break though, is that double-kick shuffle just before the second snare. It's muddy, it's harsh, and it just sounds like garbage. It should be the shuffle mapped to F. I'm actually going to go through my pattern and remove all the Fs and leave them with a single kick at 58 volume.

Keep this pattern, this will be your go-to pattern for the standard break. Now I want you to clone this pattern and work on some variation. Here's the XML data from my second sequence. Copy all that XML and paste it into Renoise. As you can see it's a small but subtle change.
NOTE: The XML is assuming that your break is instrument 00, as mine is. If you have been following the tutorial, it should be fine. Don't worry, I'll upload the finished file for all to see and understand.
Alright, and here's some more variations for you, just to try out and have fun with.
Now that you have the basics of the break down and you are working on variations, we're going to dig a bit deeper into the instrument settings.
So open up the envelopes tab on your instrument editor. The default one will be volume, and that'll be the only one we play with. So which ever envelopes you add to an instrument, it is applied to all the samples of that instrument. What I want to be able to do is use just the snare or just the hihats from the shuffle. The issue when I trigger the shuffle is that it plays both hats and snare. I want to be able to do an OFF note right after the hihat hit, giving me a nice hat sound to construct beats with. So go ahead, turn the Volume envelope on and make it 7 lines large.

Now you will want to change the envelope to the sustain is at the first line and the volume drops to 0 by the 4th.

You will notice that I also have set the release to 0. This means that it will play the entire envelope no matter what. Setting a value only plays so much of the envelope past the sustain marker, which is the solid white line with the knob at it's head. I moved it from the right side to the left side. So now what happens is when I signal a note-off, the envelop will cut the volume. Meaning I can place a shuffle, then a note-off right after it and it will only play the hats.
After you apply the envelopes, find some of your D# and E notes and place a note-off right after them. You can place a note-off by hitting the capslock button while in the pattern editing mode. Check this pattern out to see what I mean.
So now that you've got the basics of cutting up samples, rearranging them, adding envelopes to the instrument for more options and variations to the break, let's work on some sample off-set and some grooves.
First, let's do some sample offset stuff. Create an entirely new pattern for this one.

So now you're getting the idea. If you to know what part of the sample you're offsetting, just open up your sample editor and look at the top line of numbers. It will give you the hex value of the sample start point.
This sadly concludes the first part of this tutorial. The next one I do will be adding other samples on top of the amen to create a rich and full sound, add some groove to the patterns and see what kind of processing makes the break sound beefy. Here's the Renoise file.
Monday, June 4, 2012
Friday, June 1, 2012
Renoise.
I'll be writing more tutorials, tips and tricks for Renoise. Thanks to a random email, I've been inspired.
Think Meta.
Tuesday, May 29, 2012
Points
I never really paid any attention to things that would not better me in some way or another. I find the most frustrating situations are when I'm subjected to passed knowledge I have acquired or something of complete irrelevance. Small talk, I'm not very good at it.
Im writing more. I may start a notebook and write my thoughts down in analogue. I never really have the time though and my phone is always on me. I hate the touch screen keyboard.
The digital realm has shown me how much we can do to alter what's around us. I feel like a lot of people are having a hard time adjusting and accepting what's digital and what's real. We've made our entire financial institution rely on a digital string of information and some fancy paper/plastic. When you buy something its a transaction of an idea of a number from one digital database to another.
What happened to real life? I hope it make a comeback. From now on though, I'll keep reading the news and staying social with my digital devices.
Saturday, May 5, 2012
Blog apps and sound sources.
Interactive news reading apps kind of creep me out. But that's alright because all know all there's nothing lost in reading the news.
I blog but I blog about nothing, as most bloggers do. This time though, I have an idea. I am going to produce first off a sample pack of home made synthesized drum sounds and then maybe some loops to follow. Its a great idea.
They will be up shortly, probably through my Freesounds account.
Sunday, April 8, 2012
Freedom a la Stallman
Freedom in software has become an important philosophy of mine while I use my computer. I feel rather in control of my software no matter which operating system I use, but there is some stuff that I have been wrestling with in my mind that just doesn't fit right.
Most of the issues are with the freedom of knowledge. And not just any knowledge, but accurate and honest knowledge. If there's one thing the scientific method has ever taught me about real life, is that it proves real life to the best of our perception of the world. We have sense, and we test all of our senses to prove authenticity of anything.
This includes knowledge.
There needs to be more clear, coherent and real knowledge readily available to the masses. Freedom of knowledge will be one of the most important aspects of the education of future generations. Having the access and understanding the access they have to this kind of knowledge is absolutely important.
It relates to a larger scale and I feel a lot of the world's issues could be solved with a mindset like this. Your interest doesn't have to be software, development, design, or what ever it. It can be cooking, but just being able to have the access of the real knowledge of how to prepare foods properly. How to grow foods. Knowing your subject makes you better at your craft.
Get it? Good.
Subscribe to:
Posts (Atom)